How To Create A Facebook Business Manager Account?
- What Is Facebook Business Manager Account?
- How to Set Up a Facebook Business Manager Account?
- How Do I Sign Up For Business Manager?
- How To Delete A Facebook Business Manager Account?
- Wrap-up
Facebook is an effective tool that can aid your business access its target audience. With your Facebook ad account, you can manage your ads, create new audiences for your campaign, gain access to other features and most importantly pay for your ads. You’re able to build brand awareness, sell your product or service, and create leads you’re running a campaign through Facebook Ads Manager.
When you set up your Facebook ad account, you can section Facebook users by demographics, interest, behaviors, and more to boost your audience. Even if it’s a basic and simple topic to consider, there are important steps for creating a Facebook ad account. Thus, we’ll go through all these steps required to create an add count through Facebook Ad Manager.
What Is Facebook Business Manager Account?
Before we dive in how to create your ad account, it’s essential to know the Facebook Business Manager platform and its assets. Facebook Business Manager is a website where businesses can operate their Facebook and Instagram ad activities and business entities. It permits you to hold your business activities apart from your personal activities.
These business entities that we’ll go through are:
- Employees or Partners you’d like to give access to
- Facebook Pages for your business properties
- Payment method you’d like to utilize for your ads
- Ad account for your business
How to Add People to Your Business Manager Account?
To add people to Pages in Business Manager, follow these steps:
- Open Business configurations.
- Click People under Users.
- Choose the person to whom you want to grant access.
- Pages can be added by clicking Add assets.
- Choose the Page to which you want to grant access. Turn on the duties you want to assign to the individual. Alternately, turn on admin access to give them full control over the asset and all available functions.
- To save changes, click.
How to Set Up a Facebook Business Manager Account?
Making an account is the first step in setting up Business Manager. Your coworkers and partners won’t have access to the private information on that account, as you must use a personal Facebook page to verify your identity.
1. Create Your Facebook Business Manager Account
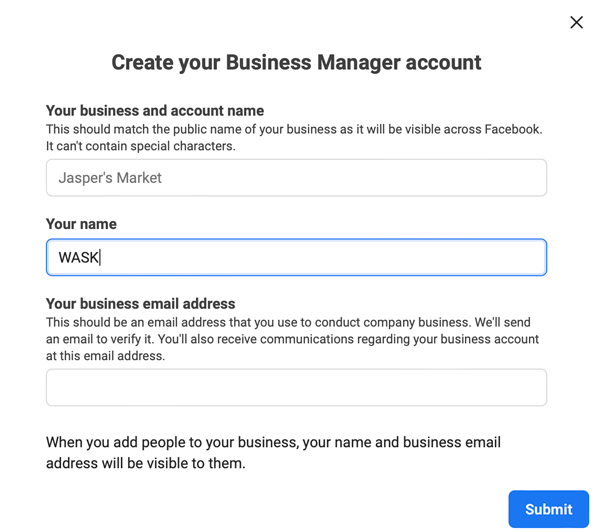
Firstly, adding your social media pages and accounts to Business Manager is important. For Facebook Business Manager account setup, you should go to business.facebook.com to access the land page. When you’ve accessed the page, you want to choose the button on the top right section of the page which is “Create Account”.
Afterwards, you’ll be requested to log into Facebook to continue. Make sure to log in utilizing the email address you use to come across your personal Facebook account. But don’t worry about any privacy or other teammates browsing your page! This’ll solely for verifying who you are and as login credentials to log on to Facebook Business Manager in advance.
After you log in to your personal account, choose the ‘’Create Account’’ button again on this link. From there, you’ll be directed to fill in your:
- Business and Account name
- Your name
- Your business email
Once you submit it, you’ll get a message that lets you know the account has been created! From there, you have to log in your work email address to verify access. In your work email inbox, find the email titles as ‘Confirm your business email’ from notification@facebookmail.com and click on the “Confirm Now” button.
Verifying your email address will immediately direct you to the Facebook Business Manager settings land page. So, it’s possible to control the pages, users, entities connected with your business now.
2. Give Access To The Business
You are able to give access to other partners and employees who needs an access to your account through the settings page on Facebook. You can do simply do this by going to the Users tab, choosing People, and inviting them by attaching name, email address, or ID in the search bar. Through there, you can give them access and send invitation.
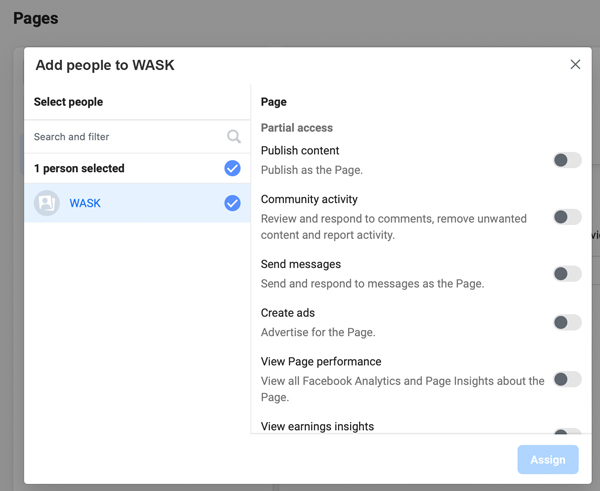
We also suggest attaching a second admin instantly in case you are unavailable and someone else who can check and control the account. When giving this person access, you need to select admin level access. This step is quite crucial because if you accidentally log out of your account or block it, it’s possible for a second admin to re-give you access.
3. Attach your business’s Facebook page
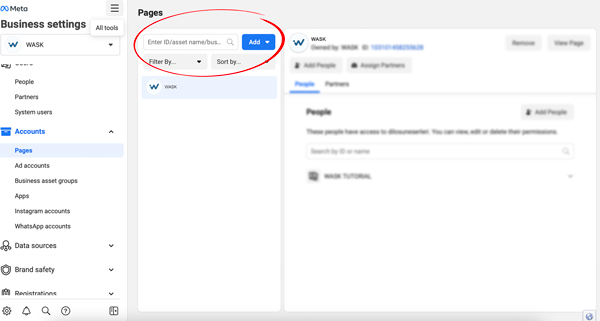
The next stage is to give the link of your business’s Facebook Page to your business manager account. In order to do that, go to ‘Pages’ under the accounts tab, choose add and then click on ‘Add a page’.
If you check your Business’s Facebook page, your business’s Facebook page might be currently viewed under this tab. If it’s like that, you can go on with the next stage.If not, you can easily do this by being an admin of your Business’s Facebook page to link it to the business manager account.
Whether you want to check you’re an admin, you can log into your Facebook, go to your business’s page through clicking ‘Pages’, then go to settings tab, and control under ‘Page roles’. If you don’t have an admin access for this page, you have to communicate with the admin so that you can gain access to this page.
After verifying the admin access, it’s possible to publicize the URL of your Facebook page into the area on the ‘Add a Facebook page’ pop-up.
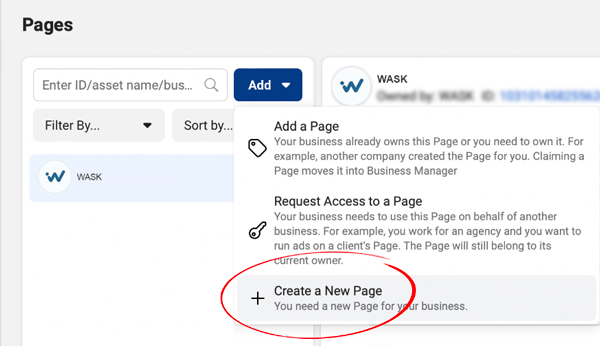
You can also have the choice to operate ads on Instagram and publicize your page if your business has an Instagram account. You can link your Instagram account under the ‘Instagram accounts’ tab to log into it.
4. Attach A Payment Method
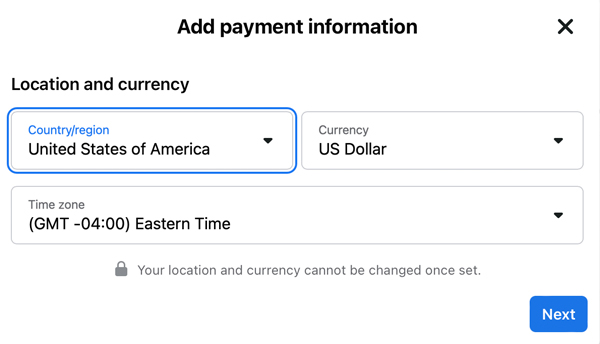
The next stage we’ll have to go through is adding your billing Info to Business Manager. When your business is operating an ad, you have to set up a payment method for it to be charged. The payment method is obviously changeable and you can set aside this stage if you do not have the information. You can connect ad account to payment method Business Manager.
You can attach the payment method from the ‘Payment Methods’ tab on the left navigation bar. Choose ‘Add Payment Method’ and fill in Credit card or Debit card information.
5. Create An Ad Account
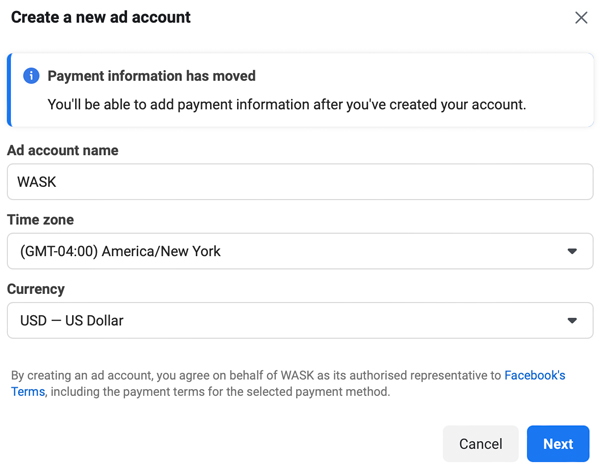
Now, you are ready to creating a gmail account to manage my business. This account will be the place to set up your ads and manage them on Facebook and Instagram.
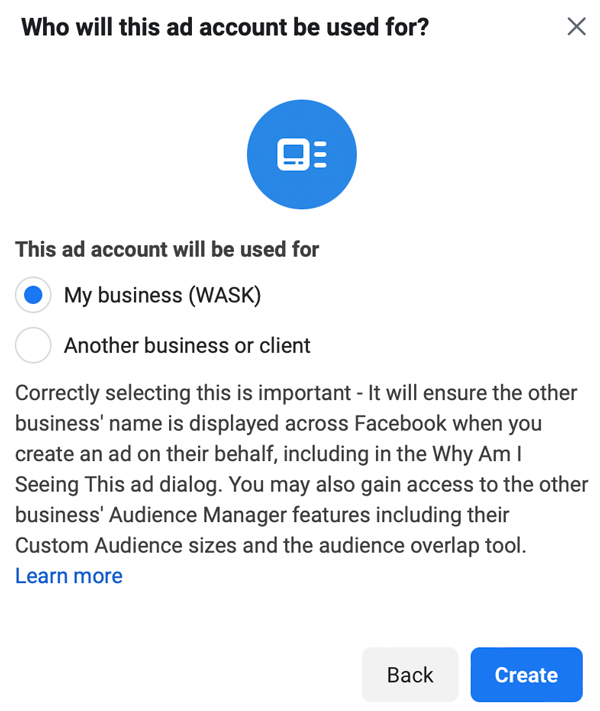
Go to the ‘Add Accounts’ tab, choose the blue ‘Add’ section and click on ‘Create a New Ad Account’. From this drop down menu, simply name the ad account, choose business page, fill in your time zone, currency and the payment method.
Afterwards, you need to pick which users you’d like to attach to this ad account and grant them access levels. There are many selections to select from too. We suggest giving Ad Account Admin level access to the employee you gave admin access to earlier.
And that’s it! Facebook business manager account setup is that easy! You can now begin running your ads for your business on Facebook! Make sure to manage Facebook Business Manager permissions. To reach the Ads Manager in which you’ll be able to form and operate ad campaigns for your business, choose the square icon on the top left of the screen and click ‘Ads Manager’.
How Do I Sign Up For Business Manager?
The use of Meta Business Manager is free. Make sure you have a personal Facebook account to establish your identity before beginning.
Afterward, register for Business Manager:
- Please visit business.facebook.com.
- To create an account, click.
- Give your company a name, choose the main Page, and enter your name and place of employment’s email address.
How To Delete A Facebook Business Manager Account?
It’s possible to remove an ad account from business manager. Open the business settings to delete your business manager. Click Business details. To permanently eliminate a business, click it and then adhere to the on-screen directions.
Wrap-up
Well done! You’ve learned how to create a new Business Manager account, how to connect your page to it, and how to create a new ad account as well. Now you’re ready to begin with your ad campaigns on Facebook. To make the most out of your data and ads, you can get the help of WASK so that you can simplify your campaigns, ads management and digital marketing. Make sure to follow these steps and get help from WASK to manage your ad accounts easily and smoothly.

What Are The Differences Between Facebook Business Manager and Ads Manager?
You can create, manage, and evaluate your advertising in Facebook Ads Manager. You can manage every facet of your business with Facebook Business Manager.
How To Manage A Facebook Business Page Without An Account?
However, you cannot create a Facebook business page or a business account without a personal account. To adhere to Facebook’s policies, you must use your own personal account to take control of a business profile.
How Do I Find My Business Manager Account On Facebook?
- Go to Business settings.
- Click Business info.
- Below Business Manager info, you’ll see your ID number.
How Many Business Manager Accounts Can You Have On Facebook?
A Facebook profile is required to set up a Business Manager account. In order to sign into Business Manager, you must enter your Facebook account and password. Compared to logging in with just an email address and password, it is more secure. Multiple Business Manager accounts can be made.
Can You Transfer An Ad Account To Another Business Manager?
You can connect instagram account to facebook business manager. If you create a new ad account in Business Manager, it’ll permanently belong to that Business Manager. Once created within Business Manager, the ad account can’t be transferred to an individual owner who doesn’t own a Business Manager.


